March 15, 2012

Chipboard Technique

Eeeeeeeeeeeeeeek!! I am on the mend!  I have a card to share with you today and a video tutorial link from my favorite go to girl for inspiration, my lovely talented friend Christina. Before we get to the tutorial, have you ever heard of Nestaboard??

Nestaboard is a chipboard that can be used many ways , it is put out by "Want2Scrap" and if you are into spellbinders you will love this product for you can achieve the same results for less the cost! They can be used in so many ways, it all comes down to your imagination!

Christina  put together an "alternative spellbinders" video sharing a way you can use Nestaboard her own unique way.

Click HERE to see "Alternative Spellbinders" video tutorial.

I may not have Nestaboard but I did have pieces of chipboard that had designs on them I didn't like so I used the same technique Christina did on her Nestaboard.

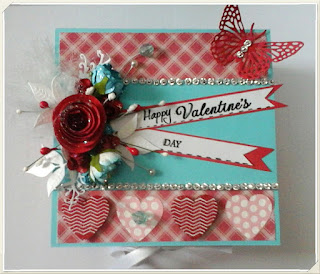
This card is probably the biggest I ever made, it is 7"by 8", it is an Aperture card which means something as that of a window but using acetate sheets as opposed to glass. The chipboard behind the sentiment piece was covered in strips of paper leaving a gap between each one, then adding glitter, to find out more go to Christina's video highlighted above!

With this close up you are able to see the silver stickles I used on the small flowers on the card to give it a little more sparkle, also you can see the light reflecting of the acetate, the sentiment and chipboard is behind this piece, this will keep it protected. If you look close on the left side you will see a Hatpin! This was also created by Christina and low and behold she also has a video on how to make these!!! That is my next mission on top of learning about InLinkz!
Click here for a video tutorial on how to "Decorate Hatpins".


Thank you for all your amazing support when I was ill!!!!!!!!!!!!


March 13, 2012

Hello card using a circle negative (tutorial)


Well Hello my bloggity friends!!!!! I cannot express how much I miss all of you! Thank you so much for your support, I am not better yet for the hives made their way back but I am hanging in there. When I start posting every day you will know I am on the mend.

Last night I gained enough energy to make a card, the ideas that have been running through my mind since I have been forced to take a break are endless! Maybe it's a good thing to take a break!

I seen a video on how to make a trellis out of corrugated cardboard and had to try it, you can find the tutorial here.  I used potpourri on my trellis!!!!, smells so nice!

The background was my own idea, here are the basics of this card ( and how to make the circle layered effect)
  • Make your card 5" by 5" (I used blue cardstock)
  • Cut a piece of pink card 1/4 " smaller for a mat 
  • Cut a piece of pattern card , again 1/4" smaller
  • Cut a piece of white card 1/4" smaller
Layer the pink paper and pattern paper on top of your blue card

Now with the white card you will cut out a 4 1/4" circle , place the circle aside, you will be using the negative.

What I did next was cut out 8 more circles the same size as the white, 41/4" and layered them all as seen in the picture, I glued each one together and place them underneathe the white negative piece starting from the lower right corner. The circles will extend over the right top side and you will have to trim once you have postiioned it the way you like, now attach to your card!
The rest is up to you!


Please remember me in your prayers!!

FOLD OVER BOX - Video Tutorial and Written Instructions

Hello! Today I am sharing with you how to make a "Fold Over Box",  a tutorial by Liz Walker Combine gift and card in o...

You may also like...