January 20, 2012

"Link Up Love Party" Valentines

Every month, Kristal Andrew over at "Getting Cricky with K Andrew" has a Link up Party!! I have decided to join the fun. I am so excited! It is such a great way to get to know each other and find new blog inspiration.


In case you don't know how a Link up Party works here are the directions:


*Link Up Party runs from Tuesday 1/17 to Tuesday 1/24.
*Grab Kristal's blinkie and post on your blogs sidebar
*Be a follower of her blog
*Create a new blog post that is titled Link Up Love Party with K Andrew. In your post, you must mention that the link up love party is a way to get to know each other and find new blog inspiration, mention Kristal's blog, with a link back to my blog .
*Post your favorite project that you've done in your blog post THAT HAS TO DO WITH VALENTINES!! That could be a card, layout, treat holder or decoration.
*Copy and paste the link up code into your blog post so the Inlinkz will show up on your blog
*Spread the word so everyone can join in!
*You must visit, follow, and comment on the 5 people before you AND the 5 people after you in the Inlinkz. It would be fantastic if you would visit as many as you can--maybe everyone? If you are one of the first 5 then you will need to blog the ones before you and a few more after--as long as it's a minimum of 10 near you in the link up tool/gadget)
If you do not do the above your link will be deleted, because it's just not fair to those who work so hard linking up and showing love to the ones on the list. I have two moderators who will be checking this out to keep it awesome and fun!


Okay so I decided I would be really brave and try doing a Panorama Card for the first time, there has been a lot of firsts for me lately, all I can say to that is I am crazy inspired these days!!!!
I made this card for my twin sister.... she loves everything I make her so this time I went all out, I can't wait to see her reaction....The two dolls are suppose to represent us, I wish I had two that looked alike, that would have been awesome!

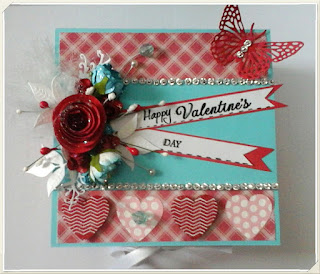
Here is my project!!

I used 3 pieces of 11 by 81/2 " card stock, scored each card on each end at 2"... I cut a circle for the window on the front and middle piece, added lace to the middle circle. Also in the middle I adhered 3 hanging items with ribbon..2 dolls and an I love you cricut cut. I attached the middle piece to the 3rd layer in which I just layered with valentines decor paper... you attach the two 2 " ends after they are scored and folded.
Then I added the front to create a box , then decorated it! The butterfly was made out of flowers and the roses I made out of a template...to learn how to make roses read the post before this one, it will give to a link to a video.


Thank you for looking! I can't wait to see what all of you are doing! On my way to the LINK UP PARTY!!!!!!!!!!!!!!!!


January 18, 2012

Sweet & Elegant Valentines Card

I am learning to master making paper roses and I am having a blast doing it. They say that everything is easy when you know how...well that phrase couldn't be more right.
If you are interested in learning how to make these roses, the lovely Christina over at card-making-magic.com has a video tutorial and like all other video tutorials she nails it!


 What I prefer about Christina Video tutorials over other tutorials is Christina has relaxing music that doesn't distract you, also Christina is relaxed, it shows in her voice tone and she is super clear on what to do.
In this particular video she even offers an alternative if you don't have a certain flower punch....that's right, you don't need a punch at all, instead she will teach you how to make a template the once where you can use it over and over, that is how I am doing it until I can purchase a punch. Be sure to check out other video tutorials, there is defiantly no shortage of them! Here is the link to make the paper roses:
 http://www.card-making-magic.com/paperrosestutorial.html


Today I am showing you the best card (I think!) I have ever made: if you are wondering how I made the background , well! it just so happens I have another link to share with you!!! It was posted by Melanie over at Fantabulous Cricut under Quick Tip Tuesdays,  I just couldn't wait to try it out! It is titled Using Ink on Vellum.


Isn't my rose beautiful!!!!  As I was making the rose, in one step it called for cutting out one petal...when I did this I thought this looks just like a butterfly!!! I then made another template smaller than the first then cut out the one petal and layered it on top of the bigger one and voila , a butterfly!!!! To get the antenna's I curled the petal that was cut out with a toothpick, glued it shut then cut half way down the center. I dipped it in my "glue and seal" glue and dipped it in Glitter. You will see a better image down below. Go to the link above to get to the "using ink on vellum" tutorial which is what I did for the background.

Here I managed to capture the shimmer!!, first I brushed on "Glue and Seal" glue then covered it with "Sugar Cube" glitter by Martha Steward

.

 Thanks for visiting and I hope this will get you inspired to start doing your sweetheart cards!

Naomi

January 17, 2012

Cupid!! You gotta love cupid!

     
       Before I show you my new projects you may have noticed my blog has been changing in the past month....well it will again only this time I have hired a professional!!!! I can't wait !!!!
Her name is Katie Price and she is up to date on the latest design which is clean and simple... 


 You Can Win!!!!!
      Head on over to InspireMeHeather to enter to win a Custom Blogger Touch-Up Package. This package includes a custom header, coordinating background, 2 column layout, and 3 additional page elements from the page elements list. Katie also gave her readers a bit of advice on how to modernize your blog layout. Go check it out!
Click the link to be directly taken to Priceless Give Away: http://www.pricelessdesignstudio.net/blogger-touch-up-package-giveaway/


Now!! unto my projects!!!!

It is close to that time again, hearts, roses, doves, flowers, cupid, chocolate, mm mm!!!! and most of all showing your romantic sweetheart or friend how much you love them.

Today I want to show you a few cards that I did , I am getting ahead unlike Christmas. I hope you can be inspired!
  
  
I loved making this card!!! It was my first attempt at making paper roses..although I didn't curl the petals I liked the result. The heart is a cricut cut, a cartridge I borrowed from a friend of mine... if I remember correctly I think it is Paper lace.
  

So simple yet so elegant... my second attempt at making paper roses.. I do like this one much better and it is too bad the image doesn't capture the white glitter, in person it shines!!!
 
Lastly, cupid! I absolutely adore this stamp, it was a $1.50 at Michael's Store....so was the cupcake stamp and I love you stamp. I stamped 2 images of the cupcake... I cut out one whole image, then just the heart on the other.. I put mount foam on the back of the cut out heart to raise it up as I also did with Cupid, Gosh I love cupid!!!!I stamped the "I love you" image using perfect medium, then using a paint brush I brushed on Perfect Pearl... once complete I spray mist on the image to make the perfect pearl set.  The color I used came from the metal set, four comes in a set...It cost approx. 27 dollars but of course I used my 40% coupon I printed off from their site.

I apologize for the lighting in the images, it is a very dreary day here so they lacked natural light.

I hope you will make a special trip back here to see what my new blog looks like!!! I will be posting the date as soon as I receive it.

FOLD OVER BOX - Video Tutorial and Written Instructions

Hello! Today I am sharing with you how to make a "Fold Over Box",  a tutorial by Liz Walker Combine gift and card in o...

You may also like...