August 25, 2012

Thank you Card/ Using negative tutorial


Happy Saturday everyone!

Welcome back or welcome for the first time , welcome, welcome, welcome!


If you are looking for the 200th Follower Give-Away , Go HERE

I wanted to be quick today because I have very close friends coming to spend the day with us, we are going to have the meanest BBQ ever! I even had a homemade pumpkin pie made by a friend of mine and it is to die for. I have a feeling I won't be that quick because I put together a picture tutorial for you!!!!

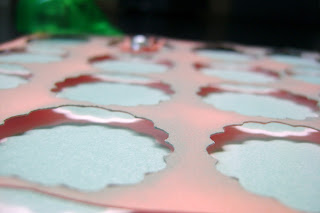
First I want to give you a quick tutorial on a negative background I used, I had cut out 120 scallop tags from the  Birthday Bash Cricut Cartridge for an order and thought what could I do with this pretty negative???


I knew it would take a little patience but I started out adhering this negative to a white piece of cardstock and I inked it up! I only did part of the page.


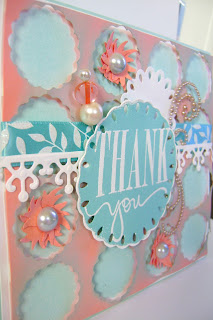
Next I cut out the size I wanted and used 3D squares on the back of the peach sheet


 Then I put the negative back over the other as it was first only now it is raised!


Then I added flowers I made from a small cheap grass punch , I embossed the words Thank you and also around the edges, added bling and a pin to decorate.
 
 
I am entering this card into Cooking with Cricut (100th Challenge) over at Melinda's Paper Crafting World.


Have a fantastic day!!


August 24, 2012

200th Follower GIVE-AWAY!!!!!!! (Cricut Cartridge + digita!!)

 Welcome my loyal followers and you who are here for the first time!


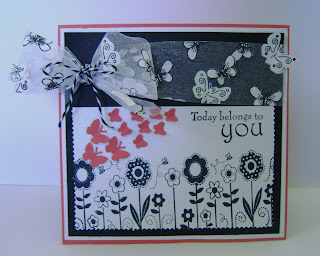
Before I get to the "Give-Away" I want to show you a card that I made that can be used for many occasions. I am in love with black and white recently but I thought I would use an alternate color to make it pop...

I am entering this card into
Splendiferous Creations
and
Word Art Wedneday


I used:
  • 2 different size butterfly punches ( Michael's Store)
  • Coral Cardstock (All cardstock from Michael's Store)
  • Black Cardstock
  • White Cardstock
  • "Today belongs to you" stamps by Inkadinkado (Walmart)
  • Butterfly organza ribbon by Crafts (Dollar Store)
The black and white flowers are stamps from Friskars, if you want to know more just go to the previous post , there is a money saving tip !!!


I cut out butterflies from the organza ribbon to give dimension... did you know that organza is so easy to cut and you don't have to be perfect for it is almost see through!


 Give-Away!!!
 
To celebrate my 200th follower I am giving away a CRICUT CARTRIDGE to one lucky winner! I will be giving away this new, never seen before now digital to 5 lucky winners!!!

 
Since I started blogging I have learned so much and wouldn't have done it without you. This journey has been nothing short of amazing and I have met such incredible talent along the way that motivated and inspired me to great depths. Thank you all from the bottom of my heart.
The cricut cartidge I choose is Paisley!! Good Luck!
 
 
In order to win you must:
  • It is not mandatory but I would love if you choose to follow my blog (if not already)
  • Follow on Facebook ( you will find 4 flower buttons up on the top right corner, it is the one with the letter "F")

 
Winners will be announced on Sept 2/2012
 
 Good Luck and have a fantastic Day!

August 23, 2012

Tutorial/Birthday Card/ Very exciting news!!!!!!!!


Well hello!

First of all I want to thank all of my followers, I am one away from the 200 mark and I plan on celebrating! I will let you know the details Friday. Hint , there will be a GIVE-AWAY!

 If you are new here, Welcome! Leave a comment and I will be sure to buzz my way over to see you and leave some bloggy love.

Before I get to my project I have very exciting news!!!

I made the Design Team over at Pin And Tack Handcrafted Delights!! This will be my first design team ever and I am so grateful and ready, I can't wait to start my journey with these very talented ladies. Thank you Corrine!

To let you know a little more about it I have copy and pasted this excerpt written by Corrine: (lets just say that Corrine is the glue that holds the creativity together)

It's time to be inspired and spark your creativity! Every month, you are invited to join Pin & Tack's Spark Your Creativity Now! challenge. Challenges start on the 1st of the month and end on the last day of the month. Anything Goes is the theme and you can share ANY craft!


To be eligible for prizes and top picks, please follow these easy rules:

- Your project must be new and never published before the start of the challenge. No back links.

- Link your project in the linky list directly to the post that shows your creation. Do not link to your general blog address as these entries will be deleted.
-
 Include "Spark Your Creativity Now" and a link back to this blog (http://pinandtack.blogspot.com) in your project post.

- You may enter as many times as you want and you can combine with as many other challenges as you'd like.

- And most importantly, be creative and have fun!


MY PROJECT FOR TODAY


Today I have a Birthday card I want to show you, there is no dimension on this card for it will be sent by the mail man and will cost less.

  • I used Gold Mirror card
  •  Flowers from my stash
  • Paper Doily
  • Mini flower and butterfly punch
  • Friskars stamp (Happy happy Birthday)
  • Presents from the cricut cartridge Birthday Bash
Now let me tell you about the Friskars stamp I used, if you are like me and want to save money at every turn this is the way to go if you don't mind a little fussy cutting.

I bought these stamps for only $3.25 ea. , they are so pretty!


 They are all attached in one strip that feeds through the New Friskars doo dad machine as shown in the next picture.


I didn't want to buy a stamp feeder for I am already struggling with room in my craft quarters so I cut each stamp out individually. The result was..., well you be the judge!


BACKGROUND TUTORIAL


In the next photo I made a very unique background for the inside of the card...

  • Take a piece of cardstock the size you want  and crumple it a few times to have as many wrinkles as you want.
  • Use an ink blender to apply ink, (I used weathered wood by Tim Holtz on cream card.) 
*You want the ink to be applied only to the raised areas so make sure you don't press to hard.*
  • Apply medium the same way
  • Add embossing powder, heat and let cool

Here is the effect you will achieve:
 

ENVELOPE

I also made an origami envelope , put white cardstock on it so the recipient can have a place to write the address. I have yet to apply another one in the top left corner for the return address, it will be layered a little over the other one which will look really nice!


Hope my post wasn't too heavy for you,
Have a super fantastic day!

August 21, 2012

Check this out!!!!!!!!!!!


Hi everyone!

I am so excited to show you the progress I am making on my New Online Store!! I am working like a savage to get this done, lol, Can't wait!!!!!!!!!!!!!!!!!!!

For those of you that build your own sites with Dreamweaver and you don't know how to add an "add to cart button", contact me because I found the most awesome way ever!!!!!!!!!!!!!!! A lot less complicated and very little to do with code. 

I took a print screen shot of it , it is just a sneak peak now!!!  Let me know what yout think!!!!!!! Do you like how it's design is near the same design as my blog!!


Have a great day.....

Do you see the Tooth Fairy digital on the picture???

It is going to be free tomorrow on my blog so don't miss out on getting her!!!

August 20, 2012

Visual Atristry Stamp Collection by Tim Holtz


Happy Monday !

I did this post Sunday night after spending the day in Charlotettown celebrating Troy's mom and dads anniversary.  We had a lovely down home country meal and it was mmmmmm!!! I also shopped at Michael's Store!!!!!!!!!!!!!!!!!!!!!!!!!!

I bought Tim Holtz's Visual Artistry Stamp collection and I'm sure I had them put to use 5 Min's after getting in the door..

Here is the card I made , I call this my 20 min Card and I am so in love with these stamps, check it out!


I am off to count Z's , I will visit all of you today, tomorrow, whatever! lol

August 19, 2012

Fanciful


Hello! Welcome back,

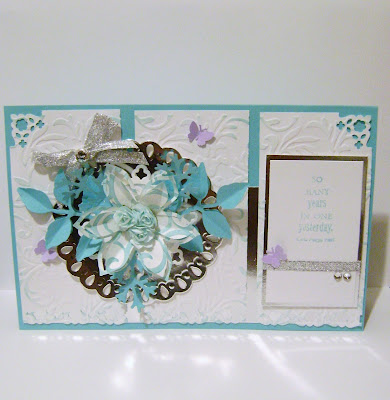
Today I am showing you a card that I made just because.. I wanted to play with my Grand Calibur and Spellbinders! I will put this card in  a pile I have that I will donate to the Autism Society of Prince Edward Island.

I love the colors of this card, I used:
Mirror Card
Blue cardstock
White cardstock
Lavender butterflies
Leaves /Scallop circles/ from Spellbinders (can't remember the exact name or number) Sadly I lend them out and never got them back, I had some cut out.


Isn't it sweet and fanciful!!!


Here is a close up:


Have a terrific relaxing Sunday.

FOLD OVER BOX - Video Tutorial and Written Instructions

Hello! Today I am sharing with you how to make a "Fold Over Box",  a tutorial by Liz Walker Combine gift and card in o...

You may also like...