
Before I show you my new projects you may have noticed my blog has been changing in the past month....well it will again only this time I have hired a professional!!!! I can't wait !!!!
Her name is Katie Price and she is up to date on the latest design which is clean and simple...

You Can Win!!!!!
Head on over to InspireMeHeather to enter to win a Custom Blogger Touch-Up Package. This package includes a custom header, coordinating background, 2 column layout, and 3 additional page elements from the page elements list. Katie also gave her readers a bit of advice on how to modernize your blog layout. Go check it out!
Click the link to be directly taken to Priceless Give Away: http://www.pricelessdesignstudio.net/blogger-touch-up-package-giveaway/
Now!! unto my projects!!!!
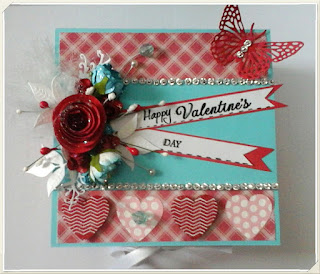
It is close to that time again, hearts, roses, doves, flowers, cupid, chocolate, mm mm!!!! and most of all showing your romantic sweetheart or friend how much you love them.
Today I want to show you a few cards that I did , I am getting ahead unlike Christmas. I hope you can be inspired!
 |
| I loved making this card!!! It was my first attempt at making paper roses..although I didn't curl the petals I liked the result. The heart is a cricut cut, a cartridge I borrowed from a friend of mine... if I remember correctly I think it is Paper lace. |
 |
| So simple yet so elegant... my second attempt at making paper roses.. I do like this one much better and it is too bad the image doesn't capture the white glitter, in person it shines!!! |
 |
| Lastly, cupid! I absolutely adore this stamp, it was a $1.50 at Michael's Store....so was the cupcake stamp and I love you stamp. I stamped 2 images of the cupcake... I cut out one whole image, then just the heart on the other.. I put mount foam on the back of the cut out heart to raise it up as I also did with Cupid, Gosh I love cupid!!!!I stamped the "I love you" image using perfect medium, then using a paint brush I brushed on Perfect Pearl... once complete I spray mist on the image to make the perfect pearl set. The color I used came from the metal set, four comes in a set...It cost approx. 27 dollars but of course I used my 40% coupon I printed off from their site. |
I apologize for the lighting in the images, it is a very dreary day here so they lacked natural light.
I hope you will make a special trip back here to see what my new blog looks like!!! I will be posting the date as soon as I receive it.


2 comments:
Ohhhhhhhhhhh WOW WOW WOW!!! I am loving your cards!! So elegant and beautiful!!! And how cool you are getting your blog done! That is AWESOME! :):):):):):):):):):):):):):):)
OMGoodness! You are the rose-making Queen! These are all so very beautiful, Naomi! I am so impressed! I just watched the rose making tutorial and printed out the instructions. I hope my tummy starts feeling better b/c I really want to make some of these today! They look so realistic. I'm sure all of my friends and family would love seeing these on the cards I send them and I hope you don't mind if I scraplift your amazing butterfly idea. These are prettier than any die-cut machine can make them! I'm loving all the stamps you used on the third one... Makes me want to go to Michael's! I wish they had an online store b/c I normally don't drive or get out of the house very much due to all the meds I'm on. Quite debilitating really! I will just have to sit and admire your work, I guess! :0) TFS Sweetie and I'm looking forward to seeing more!
XO ~ Amy Jo
Post a Comment