
Happy Valentine's Day!!!,
thank you for visiting.
This is a very heavy post:
First I have a card to show you that was inspired by an image Lisa posted over at
Decosse's Dynamite Doodles,
for Motivational Monday's every Monday. Lisa has just started Pinterest inpiration that will take place once a month on Motivational Monday's!
Here is the image


This is a very heavy post:
First I have a card to show you that was inspired by an image Lisa posted over at
Decosse's Dynamite Doodles,
for Motivational Monday's every Monday. Lisa has just started Pinterest inpiration that will take place once a month on Motivational Monday's!
Here is the image

Image courtesy Paul Lavoie. Photobotos.
(the address to link the photo is: http://www.photobotos.com/romantic_night/
(the address to link the photo is: http://www.photobotos.com/romantic_night/
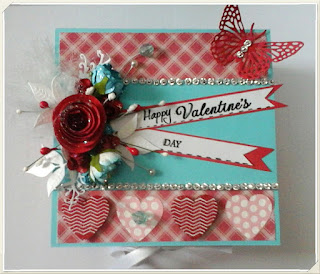
Here is what I came up with , this card is for Troy and you all know what I think of him! Beautiful!


I would like to mention that I have upgraded the "add to cart" button in my digital store and I am very happy to say that I got my first purchase last night!!! It helps when everything works! LOL You can now pay with Paypal and Google.
I am really excited to share my very own creation with you!! I warn you I am in quite a silly mood.
I was playing with a paper bag and said "self, this looks like a wallet or purse!" I raced to the craft room , tripped and near killed myself and never took notice of the bruise on my leg until that night, a whopping one with that!
(Hi , my name is Naomi Edwards and I am a craftaholic and can exaggerate)
So I started off taking measurements so I can do a tutorial for you!!!
First, here is my project


Measurements
To understand the measurements here is a crash course: if you are a beginner you will benefit from this.
I don't know if all score boards are measured the same, I have the Martha Stewart version ,
Each notch is 1/8" and it is also measured in inches.
As an example to help you understand I scored at 5 5/8" (in the image below)
This means I counted up 5 notches from 5 " which is just a notch past 5 1/2 "mark.
To help understand a little further
Just remember that 4/8ths is half and inch
and
8/8ths is an inch

So onto the tutorial!
Paper bag size: 10 6/8" by 5 2/8"
Score @ 5 5/8" and 7" widthwise
Flip base of bag over as shown in photo below and score @
1 1/2 "

Cover both sides with your choice of paper
4 (pieces) @ 3 7/8" by 5 2/8"
2 @ 1 3/8" by 5 2/8"
2 @ 3/8" by 5 2/8 "
2 @ 1 5/8 " by 5 2/8"
2 @ 1/2" by 5 2/8"
Now that the measurments are out of the way you will now fold the paper bag on the score lines using a bone folder. Enlarge image to read text.

To make the handles I used black pipe cleaners and clear beads..so easy!!!
To mount it on the purse I cut
4 @ 1/2" squares
Put handles in place using repositional dots to help keep in place as I mounted each 1/2" square over each end using Tacky Glue.
Voila!!! Now all you have to do is pretty it up with some pattern paper and embellishments!!!!!
I hope this tutorial is easy to follow, if you have any questions I would be happy to answer.
Have a super day!!!


13 comments:
Love the stick figures on the bench. Your purse is very cute. Love the paper.
Ouch on the bruise ... but YAY on the digi purchase!! I loveeeeeeeeeeeeeeeeee this!! I love love love love the fun, bright colors!!! GORGEOUS!!!
Love the purse and love you my friend! Happy Valentine's Day hon! Hugs :)
Ouch, sorry about the bruise, but the purse is amazing!! I absolutely love it!! The card is gorgeous, too!! You did fabulous on both my friend!! Happy Valentine's Day :)
Lisa
A Mermaid's Crafts
Did you say SILLY?...I LOVE Silly!!!
Love your BEAUTIFUL Purse!!Thanks for stopping by my blog and leaving me bloggie love.
laughed so much about the comment of TROY!!still
laughing..LOL.
Now please be careful,do not fall apart on me..LOL.I need YOU..LOL!!
Wishing you,Michael & Troy a Happy Valentine's Day,
Migdalia
Amazing projects girl! The card is super duper cute and the purse...AMAZING!!! Such fun papers!
Happy Valentine's Day!
Sherrie K
http://sherriescraps.blogspot.com
Such a sweet card and how cool is that purse!
Congrats on your first sale....cheers to many more! yay!
FAB creations Naomi!!! You did an awesome job on the card and that paper bag purse is adorable!!!!
Thanks for sharing and happy Valentine's Day :)
Firstly - I love the card Naomi - its wonderful. Secondly, I love the paper bag purse - wow!! And Finally sending you a little late in the day, Happy Valentines Day:-) Hugs, Karon
You are a very clever girly, this is fabulous and does look like a purse - love it. Great tutorial too, thanks for explaining and sharing with everyone.
As for the bruise, its a bit like a spider when one is spied... I always tell John it was this big ... (holding fingers out 6" wide) and say ... with big beady eyes and giving me 'that' look. John just rolls his eyes and swipes the 2mm spider out of the house. LOL Hope your bruise heals quickly, normally the ones we don't see till later are the ones that hurt the most.
Adore your card too Naomi, I can image Troy loved it, and the meaning behind the hearts.... xxx
P.S You can keep your germs too, I got enough of my own! :-/
My sweet and beautiful friend, these projects are STUNNING! (Just like your heart!) :o) Your creative spirit is so beautiful and I am truly honored to get to see your heartfelt creations. The card is sweet and adorable, just like I always envision both of you :o) As for the purse.. it is exquisite! Every detail is perfectly marvelous and it was so sweet of you to make and share the tutorial. :o) You know, it makes me sad that I can't get here every day, but I try my hardest... always know that you are in my heart and prayers, even when a couple silent days have to go by! I love you more than I love sparkles! (I'll be back in a wee bit to finish catching up!)
Hugs and blessings!
Well now that is something you don't see every day--a paper bag being turned into a work of art! Well done on both it and the card. Glad something I posted helped to inspire you.
Hugs,
Lisa
Post a Comment