Happy New Year!!!!!
It will take some time remembering that it is 2013, they say if you say anything 3 times you are more likely to remember, so here goes, say it
2013!!! 2013!!! 2013!!!
Do you believe in New Years Resolutions?? I am going to freshin up my HTML skills and start doing blog makeovers!!!!! Yeah? Yeah?.. so by next year I should have another website offering my services to beautiful people like you!!!!
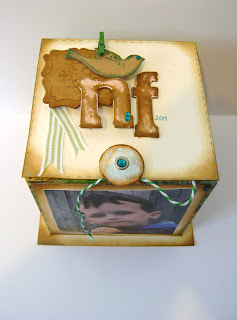
I love getting creative and coming up with something I haven't seen before (that is not to say it is not out there somewhere) I have seen photo cubes that you can buy that are made out of chipboard but mine is two half squares that I accidently stumbled upon while playing and learning how to do origami! To make it stronger I used two 8" squares cut out from cardstock.
I put together some what of a tutorial, but you will get the idea.
First here is my project: The photos used were sweet Michael on our trip to my hometown in 2009
Ok! So here we go:
First get two pieces of 8" bt 8" cardstock, you will do the same with both for two parts make up the cube. (I used paper for this tutorial)
Fold from opposite corners both ways : here is a picture on one way, you then have to do it again to the opposite corners.
Flip paper over and fold in half, again do opposite sides
The creases should look like this when flattened out: (Sorry it is so hard to see!)
The next step would be to glue to keep it together then make an exact copy.
Fit one over the other and glue in place.
Next I added a flap that opens on top and made a closure for the bottom and embellished it! Voila!
Have fun!
Hugs


13 comments:
Happy New Year Naomi!!
LOVE your photo cube!! What a GREAT way to display pictures!!!
TFS
Wonderful box and love the distressing. Great photos too:-) Happy New Year Naomi to you and yours. Hugs, Karon.
Ohhhhhhhhhhh I love love love this!!! What a great project!!! Happy New Year!!
Love the cube Naomi it looks really good and a wonderful way to display photos xx
I love this Naomi, this is a great idea and I love seeing Michael's picture, he is so adorable. Thank you for the idea, Now you know I have to try it but of course I will use 2 hands LOL love you Sweetie, hugs, Cathy K
Happy New Year my sweet friend! I'll be getting back into the studio later this week and will add this to my to do list. Of course, I'll link back to this post. Hugs
Oh wow, Naomi, this is so fabulous!! I love the look, and the pictures of Michael are so sweet!! What an awesome project!! I hope you had a safe and joyous New Year's celebration!! Happy 2013 my friend...can't wait to see what amazing things you create in the new year!! And I hope you are feeling better each day :)
Lisa
A Mermaid's Crafts
Aaaaw, your little Michael is so handsome! What a fantastic project! So very creative, may have to try this:) Love how yours turned out! TFS!
Happy New Year!!
Sherrie K
http://sherriescraps.blogspot.com
Beautiful cube :)
Happy New Year Naomi :)
This is so gorgeous, love the cube and how it hosts photographs, what a wonderful idea Naomi. I have seen the exploding boxes, but not one like this!! :-)
What a wonderful project - and such lovely photos of your precious Michael!! The photo cube is such a fabulous way to show off all those great shots!
This is Amazing my friend!Lovely photos of Michael!Love the idea of a blog makeover,I am thinking of having one but for March or April..
Sending a Huge amount of bloggie love to you,
Michael & Troy,
Migdalia
Cool idea. Oh and another tidbit. If you practice something for 21 days straight it is also supposed to become habit. So maybe by January 21st you'll have 2013 down pat!
Hugs,
Lisa
Post a Comment